Here it is. Your final project.
Requirements:
1. Come with new photographs each week.
2. Be productive the entire time you are shooting. Don't get into a funk.
3. Be creative.
4. Don't forget what you have learned this term.
5. Twelve prints and twelve images on the blog. They need to be the same. THEY NEED TO BE GREAT!
DUE DATES:
Your final project is due on Thursday, May 20th. We will take Thursday and Friday to critique. Your project is due at the BEGINNING OF CLASS on Thursday. I will turn off the printers so that you cannot print during critique. The blog will be due at the same time.
You will turn in your final project prints and your notebook for final grading.
This is worth 20% of your grade, so take is seriously!
(insert concerned look here...)
Thursday, April 29, 2010

Assignment #9 - Final Project Proposal
I need to know what you are doing for your final project. More importantly, YOU NEED TO KNOW WHAT YOU ARE DOING FOR YOUR FINAL PROJECT.
Write, with some detail, what your plans are for your final project. Include things like the larger concept of what you are trying to convey, as well as some specific details of how you are going to accomplish this project.
Assignment #9 is due on Thursday, May 6th.
You can write about your project and post it on your blog anytime, but you need to post it before you can start shooting your final project.
Don't forget to do this! It is something that can kill your grade if you don't.
Write, with some detail, what your plans are for your final project. Include things like the larger concept of what you are trying to convey, as well as some specific details of how you are going to accomplish this project.
Assignment #9 is due on Thursday, May 6th.
You can write about your project and post it on your blog anytime, but you need to post it before you can start shooting your final project.
Don't forget to do this! It is something that can kill your grade if you don't.
Friday, April 16, 2010
Assignment #8 - ReDo
So here is your Assignment #8:
Choose one of your assignments that you are not very happy about and re-do it. The criteria will be exactly the same.
Don't just do it again, do it BETTER! Think about all that you have learned and apply it to your re-shoot.
If you don't do it better, don't do it at all.
Due:
y Block - Thursday April 29th...(at the beginning of class...).
Z Block - Thursday April 29th...(at the beginning of class...).
Choose one of your assignments that you are not very happy about and re-do it. The criteria will be exactly the same.
Don't just do it again, do it BETTER! Think about all that you have learned and apply it to your re-shoot.
If you don't do it better, don't do it at all.
Due:
y Block - Thursday April 29th...(at the beginning of class...).
Z Block - Thursday April 29th...(at the beginning of class...).
Thursday, April 15, 2010
Friday, April 9, 2010
Assignment #7 - Numbers
So you guys probably thought you were going to escape my torture huh? Well guess again...
Assignment number two. It's really your first real REAL assignment. Kick some tail.
Here are the requirements:
You will make 100 images. No more...no less.
You will make your first frame contain the number zero (0).
Your second frame will contain the number one (1).
Your third frame will contain the number two (2).
Can you guess what your fourth frame will contain? Yep, a number three (3).
Rinse and repeat.
You will end up with 100 images, starting with number 0, ending with 99.
Remember, no deleting, no re-shooting numbers, if you make a mistake on the exposure, go on to your next number. Fix your exposure for the next number before shooting (duh).
DO NOT TAKE THIS ASSIGNMENT LITERALLY. Be creative in how you represent the numbers you will shoot. Bonus points if you photograph them in braille. Extra bonus points if you can photograph 99 Bigfoots (Bigfeet?) for the final exposure. DO NOT have your parents drive you all over town. DO NOT go walking up and down the street looking for addresses that work. You can shoot this assignment within the comfort of your own home. There are easily 100 sequential numbers in your house.
Show me your top 10 numbers on your blog and print 5 of those for critique.
Due on 4/16
Quote for the day:
"Photoshop is a crutch for those who are too lazy to get it right in the camera."
I said this, it is my quote. If you quote me, attribute me. If you don't quote me I will be sad.
Good luck!

Assignment number two. It's really your first real REAL assignment. Kick some tail.
Here are the requirements:
You will make 100 images. No more...no less.
You will make your first frame contain the number zero (0).
Your second frame will contain the number one (1).
Your third frame will contain the number two (2).
Can you guess what your fourth frame will contain? Yep, a number three (3).
Rinse and repeat.
You will end up with 100 images, starting with number 0, ending with 99.
Remember, no deleting, no re-shooting numbers, if you make a mistake on the exposure, go on to your next number. Fix your exposure for the next number before shooting (duh).
DO NOT TAKE THIS ASSIGNMENT LITERALLY. Be creative in how you represent the numbers you will shoot. Bonus points if you photograph them in braille. Extra bonus points if you can photograph 99 Bigfoots (Bigfeet?) for the final exposure. DO NOT have your parents drive you all over town. DO NOT go walking up and down the street looking for addresses that work. You can shoot this assignment within the comfort of your own home. There are easily 100 sequential numbers in your house.
Show me your top 10 numbers on your blog and print 5 of those for critique.
Due on 4/16
Quote for the day:
"Photoshop is a crutch for those who are too lazy to get it right in the camera."
I said this, it is my quote. If you quote me, attribute me. If you don't quote me I will be sad.
Good luck!
Friday, April 2, 2010
Thursday, April 1, 2010
Portraits of Holocaust Survivors

Jerzy Ulatowski, KL Auschwitz survivor, No. 192823 - Marciek Nabradalik/VII Mentor Program
Hey guys,
Please read this article from the NY Times about this photographer who is shooting portraits of Holocaust survivors.
Pay attention to what his goals are and what techniques he is using to accomplish those goals.
This might be something interesting to try in your own portraiture.
Click the below link:
One Last Sitting for Holocaust Survivors
Thursday, March 25, 2010
Assignment #6 - Portraits
From Wikipedia (yeah, a terrible source, but I liked the definition...)
Portrait:
"A portrait is a painting, photograph, sculpture, or other artistic representation of a person, in which the face and its expression is predominant. The intent is to display the likeness, personality, and even the mood of the person. For this reason, in photography a portrait is generally not a snapshot, but a composed image of a person in a still position. A portrait often shows a person looking directly at the painter or photographer, in order to most successfully engage the subject with the viewer."

Three rules to this assignment.
Rule #1: NO MYSPACE PHOTOS - I think you all know what this means. You've seen 'em, you've taken 'em, I don't want 'em.
Rule #2: You need to shoot at least three separate people.
Rule #3: One of those three people MUST be yourself...but, you can't BE yourself...
Here is Cindy Sherman doing her version of Lucille Ball.

Here is a link to the National Portrait Gallery. You will get a lot of good ideas here from paintings, sculpture and photography.
National Portrait Gallery
Here is one of my favorite portrait photographers...Richard Avedon
Richard Avedon Portrait Gallery
Hiroshi Watanabe's gallery has a few sections of portraits that are interesting.
August Sander was a German photographer who made portraits of farmers and working class people near Cologne prior to World War II. After the Nazi's gained power, Sander continued to shoot the people in his city, many of them shown in Nazi military uniforms. Sander's portraits provide possibly the widest cross-section of Germans during that time.
Here is a self-portrait of me as Abraham Lincoln.
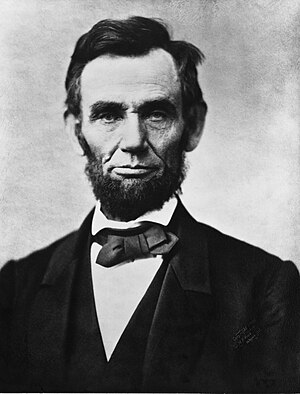
Due on Friday, April 9th.
10 on blog, 5 prints, ONE of which needs to be a 'self-portrait'.
Portrait:
"A portrait is a painting, photograph, sculpture, or other artistic representation of a person, in which the face and its expression is predominant. The intent is to display the likeness, personality, and even the mood of the person. For this reason, in photography a portrait is generally not a snapshot, but a composed image of a person in a still position. A portrait often shows a person looking directly at the painter or photographer, in order to most successfully engage the subject with the viewer."
Three rules to this assignment.
Rule #1: NO MYSPACE PHOTOS - I think you all know what this means. You've seen 'em, you've taken 'em, I don't want 'em.
Rule #2: You need to shoot at least three separate people.
Rule #3: One of those three people MUST be yourself...but, you can't BE yourself...
Here is Cindy Sherman doing her version of Lucille Ball.
Here is a link to the National Portrait Gallery. You will get a lot of good ideas here from paintings, sculpture and photography.
National Portrait Gallery
Here is one of my favorite portrait photographers...Richard Avedon
Richard Avedon Portrait Gallery
Hiroshi Watanabe's gallery has a few sections of portraits that are interesting.
August Sander was a German photographer who made portraits of farmers and working class people near Cologne prior to World War II. After the Nazi's gained power, Sander continued to shoot the people in his city, many of them shown in Nazi military uniforms. Sander's portraits provide possibly the widest cross-section of Germans during that time.
Here is a self-portrait of me as Abraham Lincoln.
Due on Friday, April 9th.
10 on blog, 5 prints, ONE of which needs to be a 'self-portrait'.
Friday, March 19, 2010
Assingment #5 - Get On Your Belly!
That's right, every and I mean EVERY shot done for this assignment will be shot from your belly...or your back. What I want you to do is to look at the world from a different point of view.
Ask yourself when you are making these images how they look different shot from the low point of view. Do they look any different? If they don't look different than if you shot them standing up, don't make the image.
Shooting from below your subject makes it look larger than life. In the 'biz' we call it the 'Hero Angle'. It makes everything look heroic, grand, powerful and large...even if it is none of those things.
Think about what you can shoot that might not be heroic, grand, powerful or large, and how this point of view can play with your perception of those things.
Images and prints due Friday, March 26th. 8 images on the blog, 4 prints.
duck a: "quack"
duck b: "quack quack"

Ask yourself when you are making these images how they look different shot from the low point of view. Do they look any different? If they don't look different than if you shot them standing up, don't make the image.
Shooting from below your subject makes it look larger than life. In the 'biz' we call it the 'Hero Angle'. It makes everything look heroic, grand, powerful and large...even if it is none of those things.
Think about what you can shoot that might not be heroic, grand, powerful or large, and how this point of view can play with your perception of those things.
Images and prints due Friday, March 26th. 8 images on the blog, 4 prints.
duck a: "quack"
duck b: "quack quack"
Sunday, February 21, 2010
High Key
So, I went out shooting this morning and made two high-key images.
Check them out.

Salt Berg, Broken Arrow Salt, Utah, 2010

Salt Ramp and Salt Heap, Broken Arrow Salt, Utah, 2010
Check them out.

Salt Berg, Broken Arrow Salt, Utah, 2010

Salt Ramp and Salt Heap, Broken Arrow Salt, Utah, 2010
Thursday, February 18, 2010
Assignment #4 - High Key / Low Key...TAKE TWO
Yes, you heard right. Do the last assignment, assignment #3, AGAIN! I know you learned a lot, but you're not quite where I want you to be. Remember to BRACKET the living daylights out of these shots. Remember to shoot BLACK objects on a BLACK background...and WHITE objects on a WHITE background.
Now the tricky part. Don't just shoot objects. Don't just show me stuff. TELL me stuff. Tell me a story. Tell me something about these objects more than just "Here is something that is white".
You have the advantage of being able to spend some time now and find the sweet light. The sweet light will help tell the story. Remember, you CAN'T take too many photos for me. You really can't.
Do more than just make photographs that fit the assignment requirements. Stretch your imagination and come up with a unique and interesting story. These stories do NOT have to be complex. They can be VERY SIMPLE. Hint: KEEP THEM SIMPLE AND THEY WILL BE GOOD.

These will be due the last class period of the week that we return back from Spring Break. I want you to print two images, put those two images on the blog, write about your first and second shooting experiences, what you learned, how you got better, how it got easier (or harder...).
Now the tricky part. Don't just shoot objects. Don't just show me stuff. TELL me stuff. Tell me a story. Tell me something about these objects more than just "Here is something that is white".
You have the advantage of being able to spend some time now and find the sweet light. The sweet light will help tell the story. Remember, you CAN'T take too many photos for me. You really can't.
Do more than just make photographs that fit the assignment requirements. Stretch your imagination and come up with a unique and interesting story. These stories do NOT have to be complex. They can be VERY SIMPLE. Hint: KEEP THEM SIMPLE AND THEY WILL BE GOOD.
These will be due the last class period of the week that we return back from Spring Break. I want you to print two images, put those two images on the blog, write about your first and second shooting experiences, what you learned, how you got better, how it got easier (or harder...).
Friday, February 12, 2010
Assignment #3 - High Key/Low Key
Two prints from High Key and two prints from Low Key, blog post and explanation (four images total), and your notebook due Friday, February 19th. Put the same images you print on the blog. I want you to also show me one example of your high-key and low-key that you did NOT process and show me the difference between it and the one you retouched. Ideally we should have a hard time telling the difference.
This assignment will be similar to the bracketing assignment, in that it will teach you to find the right exposure depending on the subject matter.
This assignment is basically two assignments in one. Treat it as such and it will be easier to break down.
You will shoot high-key and low-key images. What is high-key? The majority of the image (85%+) will be tones of light gray to white. It will help you to think of shooting white objects placed on a white background. So, then the opposite of high-key is low-key right? Think of low key as gray-ish to black objects. Shoot your dark objects placed on a dark background. You might need a tripod/beanbag for these shots.
For both of your shots you will want to pay close attention to the background. Don't let stray light/objects ruin your clean shot. Also it helps to isolate the objects by getting close. Take a look at the examples below.
You will want to shoot both of your high-key and low-key shots using the bracketing technique that we learned. Go from very very VERY underexposed all the way to very very VERY overexposed for each of the shots...both high-key *and* low-key.
Using the extreme bracketing you will find that buried somewhere in those images is a nearly perfect exposure. That will be your starting point. We will take those good exposures into post-production in the studio.
Here are some examples:


HERE IS A SLIDESHOW of student work.
Yes, this is an assignment that I even give to my basic black and white college film class. Here's the proof...

Things you will definitely want to be paying attention to:
Focus - make 'em sharp!
Light - will make or break the entire assignment. Move the light around the objects if you are shooting indoors...move the objects around into different light if you are shooting outdoors.
We will lecture and show examples of this in class. This WILL BE an assignment you will want to go back and re-shoot a few times. Don't consider doing it wrong the first time a failure...consider it good practice.
This assignment will be similar to the bracketing assignment, in that it will teach you to find the right exposure depending on the subject matter.
This assignment is basically two assignments in one. Treat it as such and it will be easier to break down.
You will shoot high-key and low-key images. What is high-key? The majority of the image (85%+) will be tones of light gray to white. It will help you to think of shooting white objects placed on a white background. So, then the opposite of high-key is low-key right? Think of low key as gray-ish to black objects. Shoot your dark objects placed on a dark background. You might need a tripod/beanbag for these shots.
For both of your shots you will want to pay close attention to the background. Don't let stray light/objects ruin your clean shot. Also it helps to isolate the objects by getting close. Take a look at the examples below.
You will want to shoot both of your high-key and low-key shots using the bracketing technique that we learned. Go from very very VERY underexposed all the way to very very VERY overexposed for each of the shots...both high-key *and* low-key.
Using the extreme bracketing you will find that buried somewhere in those images is a nearly perfect exposure. That will be your starting point. We will take those good exposures into post-production in the studio.
Here are some examples:


HERE IS A SLIDESHOW of student work.
Yes, this is an assignment that I even give to my basic black and white college film class. Here's the proof...

Things you will definitely want to be paying attention to:
Focus - make 'em sharp!
Light - will make or break the entire assignment. Move the light around the objects if you are shooting indoors...move the objects around into different light if you are shooting outdoors.
We will lecture and show examples of this in class. This WILL BE an assignment you will want to go back and re-shoot a few times. Don't consider doing it wrong the first time a failure...consider it good practice.
Thursday, January 28, 2010
Assignment #2 - Bracketing
This assignment will teach you that the 'right' exposure is not necessarily the 'best' exposure.
READ THE INSTRUCTIONS SLOWLY AND COMPLETELY. EVERYTHING YOU NEED TO DO IS IN THE INSTRUCTIONS.
Here are the steps you need to follow:
1. Choose a static object that will not move (that's what static means right?) The object should be large enough to fill the frame. You will use this object for ALL of the next exposures. DO NOT RECOMPOSE. A tripod could be helpful.
2. Focus sharply. Use your manual focus. Get it sharp *before* you make any images.
3. Make a 'good' exposure. Use your histogram. Make sure you do not clip the shadows or the highlights. Your histogram for this 'good' exposure should look approximately like this: To get to where you can see your histogram, once you take the picture, press the PLAY button. If you press the DISP button it will scroll you through various options, one of them will have the histogram. If you have any questions, e-mail me.

4. Open up the lens aperture completely. Set it to it's lowest number...for some of you this will be 2.8, for some it will be 2.0.
5. DO NOT CHANGE THE SHUTTER SPEED.
6. Make an exposure.
7. Close down the aperture one stop (i.e. go from 2.8 to 3.2).
8. Make an exposure.
9. Close down the aperture one stop (i.e. go from 3.2 to 3.5).
10. Make an exposure.
11. Can you guess what comes next? Yep...close down aperture one stop.
12. Make an exposure.
13. Repeat until you have reached your smallest aperture (f/8).
14. DO NOT DELETE ANY EXPOSURES EVEN IF YOU THINK THEY LOOK BAD.
15. Choose a different static object. You will use this object for all of the remaining exposures.
16. Make a 'good' exposure with your aperture set to 5.6. Adjust the shutter speed as needed.
17. Adjust your shutter speed to 1/2000
18. Make exposure. (do not change aperture)
19. Adjust shutter to 1/1000
20. Make exposure.
21. You will continue the pattern using the following shutter speeds in this order: 1/500, 1/250, 1/125, 1/60, 1/30, 1/15, 1/8, 1/4, 0"5, 1", 2", 4", 8", 15". Make an exposure for EACH OF THE SHUTTER SPEEDS.
22. Choose another static object.
23. Repeat steps 2-13
24. Choose another static object.
25. Repeat steps 16-21
26. Have fun making 50 more GOOD exposures of WHATEVER YOU WANT!!!! Remember to consult your histogram. TRUST IT!
Images are due on Monday, Febuary 2. We will upload them in class and discuss our results. This assignment will require several things. One...pay ATTENTION TO THE DIRECTIONS! You will mess up if you don't. You might mess up even if you do. You will probably re-shoot this assignment at least one more time. Be prepared for that. Come next week with your images and we will talk about what you did wrong...and what you did RIGHT.
Remember...keep it SIMPLE. NOT like this:

READ THE INSTRUCTIONS SLOWLY AND COMPLETELY. EVERYTHING YOU NEED TO DO IS IN THE INSTRUCTIONS.
Here are the steps you need to follow:
1. Choose a static object that will not move (that's what static means right?) The object should be large enough to fill the frame. You will use this object for ALL of the next exposures. DO NOT RECOMPOSE. A tripod could be helpful.
2. Focus sharply. Use your manual focus. Get it sharp *before* you make any images.
3. Make a 'good' exposure. Use your histogram. Make sure you do not clip the shadows or the highlights. Your histogram for this 'good' exposure should look approximately like this: To get to where you can see your histogram, once you take the picture, press the PLAY button. If you press the DISP button it will scroll you through various options, one of them will have the histogram. If you have any questions, e-mail me.
4. Open up the lens aperture completely. Set it to it's lowest number...for some of you this will be 2.8, for some it will be 2.0.
5. DO NOT CHANGE THE SHUTTER SPEED.
6. Make an exposure.
7. Close down the aperture one stop (i.e. go from 2.8 to 3.2).
8. Make an exposure.
9. Close down the aperture one stop (i.e. go from 3.2 to 3.5).
10. Make an exposure.
11. Can you guess what comes next? Yep...close down aperture one stop.
12. Make an exposure.
13. Repeat until you have reached your smallest aperture (f/8).
14. DO NOT DELETE ANY EXPOSURES EVEN IF YOU THINK THEY LOOK BAD.
15. Choose a different static object. You will use this object for all of the remaining exposures.
16. Make a 'good' exposure with your aperture set to 5.6. Adjust the shutter speed as needed.
17. Adjust your shutter speed to 1/2000
18. Make exposure. (do not change aperture)
19. Adjust shutter to 1/1000
20. Make exposure.
21. You will continue the pattern using the following shutter speeds in this order: 1/500, 1/250, 1/125, 1/60, 1/30, 1/15, 1/8, 1/4, 0"5, 1", 2", 4", 8", 15". Make an exposure for EACH OF THE SHUTTER SPEEDS.
22. Choose another static object.
23. Repeat steps 2-13
24. Choose another static object.
25. Repeat steps 16-21
26. Have fun making 50 more GOOD exposures of WHATEVER YOU WANT!!!! Remember to consult your histogram. TRUST IT!
Images are due on Monday, Febuary 2. We will upload them in class and discuss our results. This assignment will require several things. One...pay ATTENTION TO THE DIRECTIONS! You will mess up if you don't. You might mess up even if you do. You will probably re-shoot this assignment at least one more time. Be prepared for that. Come next week with your images and we will talk about what you did wrong...and what you did RIGHT.
Remember...keep it SIMPLE. NOT like this:
Monday, January 25, 2010

Saturday, January 23, 2010
Double-yolk egg
This morning I had the chance to tell a unique story. I had my very first double-yolked egg! I have never had one, but this egg was VERY big. I noticed that each of the yolks from the double-yolked egg is larger than the regular yolk from the single-yolked egg. This is from one of my chickens that is named Vader. It was yummy on some toast for breakfast.

Friday, January 22, 2010
Assignment #1 - Scavenger Hunt
Ok gang, this first assignment is designed to get you used to using your camera, understand it's functions and really, most importantly, to have some fun.
I want you to follow these instructions for this assignment. Following instructions with exactness is crucial to many of the things we will do in photo. It is a very process-intense thing to do all of this right, so pay attention and you'll do fine.
1. Take your camera and set it on 'P'.
2. Try and find the following objects to photograph: tree, bird, dog, car, cat, platypus, friend, mom, dad, sky, floor, hand, something red, something green, something scary, something funny.
3. Try to mix it up with your shots. Get close, get closer, get REALLY close. Let the camera focus before you take the picture.
4. Get at least 30-50 shots of whatever it is you have found. It is NOT important that these images are perfect works of art. These images are PRACTICE! These images will give us some files that we can work with next week to teach you how to upload your images to the server, how to set up your blogs, etc... Something to work with is better than nothing to work with, so be sure you get something in your camera.
5. DON'T FORGET TO BRING YOUR CAMERA TO CLASS ON MONDAY! This is really important...if you don't have your images to class then the assignment is LATE and your grade will suffer. Not only that, but if you don't have your images with you then you won't be able to follow along with me as I do my demo on Monday.
6. Open your instruction manual read it and play with the various settings on the camera. Learn it's controls as much as you can. You don't have to understand everything, just the basics for now. We will go over in class in a very detailed manner everything you will need to know. For now just the basics are good. This will be the only assignment you ever shoot on 'P'. The rest of the shooting will be on 'M'. If you are really ambitious you can set your camera on 'M' and mess around with it.
7. If you are REALLY ambitious, start over from the beginning and re-photograph what you shot at first. You might be surprised at what you learned and how much better the images turn out.
I want you to follow these instructions for this assignment. Following instructions with exactness is crucial to many of the things we will do in photo. It is a very process-intense thing to do all of this right, so pay attention and you'll do fine.
1. Take your camera and set it on 'P'.
2. Try and find the following objects to photograph: tree, bird, dog, car, cat, platypus, friend, mom, dad, sky, floor, hand, something red, something green, something scary, something funny.
3. Try to mix it up with your shots. Get close, get closer, get REALLY close. Let the camera focus before you take the picture.
4. Get at least 30-50 shots of whatever it is you have found. It is NOT important that these images are perfect works of art. These images are PRACTICE! These images will give us some files that we can work with next week to teach you how to upload your images to the server, how to set up your blogs, etc... Something to work with is better than nothing to work with, so be sure you get something in your camera.
5. DON'T FORGET TO BRING YOUR CAMERA TO CLASS ON MONDAY! This is really important...if you don't have your images to class then the assignment is LATE and your grade will suffer. Not only that, but if you don't have your images with you then you won't be able to follow along with me as I do my demo on Monday.
6. Open your instruction manual read it and play with the various settings on the camera. Learn it's controls as much as you can. You don't have to understand everything, just the basics for now. We will go over in class in a very detailed manner everything you will need to know. For now just the basics are good. This will be the only assignment you ever shoot on 'P'. The rest of the shooting will be on 'M'. If you are really ambitious you can set your camera on 'M' and mess around with it.
7. If you are REALLY ambitious, start over from the beginning and re-photograph what you shot at first. You might be surprised at what you learned and how much better the images turn out.
Friday, January 15, 2010
Final Blog Entry - Self Evaluation
Hey guys,
First of all I want to say again, a big thank-you for all of the hard work you have done for me this year. I really appreciate it. I have seen you all grow in ways beyond photography and the scope of this class, and I am happy and proud to have been around to see it.
I want you all to do a little looking back over the course of this year and pause for some self-evaluation. I want you to all write a few paragraphs about what you learned this year with me. I want you to NOT write about technology or cameras or Lightroom or blogging or printing. I want you to write about how your vision changed. How are you a different photographer today than you were at the beginning of the year. It might help to scroll back through your own blogs and look back at your early work.
I look forward to reading and sharing your responses with my colleagues.
Thanks again!

First of all I want to say again, a big thank-you for all of the hard work you have done for me this year. I really appreciate it. I have seen you all grow in ways beyond photography and the scope of this class, and I am happy and proud to have been around to see it.
I want you all to do a little looking back over the course of this year and pause for some self-evaluation. I want you to all write a few paragraphs about what you learned this year with me. I want you to NOT write about technology or cameras or Lightroom or blogging or printing. I want you to write about how your vision changed. How are you a different photographer today than you were at the beginning of the year. It might help to scroll back through your own blogs and look back at your early work.
I look forward to reading and sharing your responses with my colleagues.
Thanks again!
Subscribe to:
Posts (Atom)
