Thursday, March 25, 2010

Assignment #6 - Portraits

From Wikipedia (yeah, a terrible source, but I liked the definition...)

Portrait:

"A portrait is a painting, photograph, sculpture, or other artistic representation of a person, in which the face and its expression is predominant. The intent is to display the likeness, personality, and even the mood of the person. For this reason, in photography a portrait is generally not a snapshot, but a composed image of a person in a still position. A portrait often shows a person looking directly at the painter or photographer, in order to most successfully engage the subject with the viewer."


Three rules to this assignment.

Rule #1: NO MYSPACE PHOTOS - I think you all know what this means. You've seen 'em, you've taken 'em, I don't want 'em.

Rule #2: You need to shoot at least three separate people.

Rule #3: One of those three people MUST be yourself...but, you can't BE yourself...

Here is Cindy Sherman doing her version of Lucille Ball.


Here is a link to the National Portrait Gallery. You will get a lot of good ideas here from paintings, sculpture and photography.

National Portrait Gallery

Here is one of my favorite portrait photographers...Richard Avedon

Richard Avedon Portrait Gallery

Hiroshi Watanabe's gallery has a few sections of portraits that are interesting.

August Sander was a German photographer who made portraits of farmers and working class people near Cologne prior to World War II. After the Nazi's gained power, Sander continued to shoot the people in his city, many of them shown in Nazi military uniforms. Sander's portraits provide possibly the widest cross-section of Germans during that time.

Here is a self-portrait of me as Abraham Lincoln.
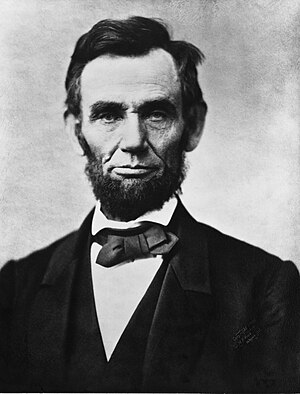


Due on Friday, April 9th.

10 on blog, 5 prints, ONE of which needs to be a 'self-portrait'.

Friday, March 19, 2010

Assingment #5 - Get On Your Belly!

That's right, every and I mean EVERY shot done for this assignment will be shot from your belly...or your back. What I want you to do is to look at the world from a different point of view.

Ask yourself when you are making these images how they look different shot from the low point of view. Do they look any different? If they don't look different than if you shot them standing up, don't make the image.

Shooting from below your subject makes it look larger than life. In the 'biz' we call it the 'Hero Angle'. It makes everything look heroic, grand, powerful and large...even if it is none of those things.

Think about what you can shoot that might not be heroic, grand, powerful or large, and how this point of view can play with your perception of those things.

Images and prints due Friday, March 26th. 8 images on the blog, 4 prints.

duck a: "quack"

duck b: "quack quack"

Sunday, February 21, 2010

High Key

So, I went out shooting this morning and made two high-key images.

Check them out.


Salt Berg, Broken Arrow Salt, Utah, 2010


Salt Ramp and Salt Heap, Broken Arrow Salt, Utah, 2010

Thursday, February 18, 2010

Assignment #4 - High Key / Low Key...TAKE TWO

Yes, you heard right. Do the last assignment, assignment #3, AGAIN! I know you learned a lot, but you're not quite where I want you to be. Remember to BRACKET the living daylights out of these shots. Remember to shoot BLACK objects on a BLACK background...and WHITE objects on a WHITE background.

Now the tricky part. Don't just shoot objects. Don't just show me stuff. TELL me stuff. Tell me a story. Tell me something about these objects more than just "Here is something that is white".

You have the advantage of being able to spend some time now and find the sweet light. The sweet light will help tell the story. Remember, you CAN'T take too many photos for me. You really can't.

Do more than just make photographs that fit the assignment requirements. Stretch your imagination and come up with a unique and interesting story. These stories do NOT have to be complex. They can be VERY SIMPLE. Hint: KEEP THEM SIMPLE AND THEY WILL BE GOOD.


These will be due the last class period of the week that we return back from Spring Break. I want you to print two images, put those two images on the blog, write about your first and second shooting experiences, what you learned, how you got better, how it got easier (or harder...).

Friday, February 12, 2010

Assignment #3 - High Key/Low Key

Two prints from High Key and two prints from Low Key, blog post and explanation (four images total), and your notebook due Friday, February 19th. Put the same images you print on the blog. I want you to also show me one example of your high-key and low-key that you did NOT process and show me the difference between it and the one you retouched. Ideally we should have a hard time telling the difference.

This assignment will be similar to the bracketing assignment, in that it will teach you to find the right exposure depending on the subject matter.

This assignment is basically two assignments in one. Treat it as such and it will be easier to break down.

You will shoot high-key and low-key images. What is high-key? The majority of the image (85%+) will be tones of light gray to white. It will help you to think of shooting white objects placed on a white background. So, then the opposite of high-key is low-key right? Think of low key as gray-ish to black objects. Shoot your dark objects placed on a dark background. You might need a tripod/beanbag for these shots.

For both of your shots you will want to pay close attention to the background. Don't let stray light/objects ruin your clean shot. Also it helps to isolate the objects by getting close. Take a look at the examples below.

You will want to shoot both of your high-key and low-key shots using the bracketing technique that we learned. Go from very very VERY underexposed all the way to very very VERY overexposed for each of the shots...both high-key *and* low-key.

Using the extreme bracketing you will find that buried somewhere in those images is a nearly perfect exposure. That will be your starting point. We will take those good exposures into post-production in the studio.

Here are some examples:


HERE IS A SLIDESHOW of student work.

Yes, this is an assignment that I even give to my basic black and white college film class. Here's the proof...


Things you will definitely want to be paying attention to:

Focus - make 'em sharp!

Light - will make or break the entire assignment. Move the light around the objects if you are shooting indoors...move the objects around into different light if you are shooting outdoors.

We will lecture and show examples of this in class. This WILL BE an assignment you will want to go back and re-shoot a few times. Don't consider doing it wrong the first time a failure...consider it good practice.

Thursday, January 28, 2010

Assignment #2 - Bracketing

This assignment will teach you that the 'right' exposure is not necessarily the 'best' exposure.

READ THE INSTRUCTIONS SLOWLY AND COMPLETELY. EVERYTHING YOU NEED TO DO IS IN THE INSTRUCTIONS.

Here are the steps you need to follow:

1. Choose a static object that will not move (that's what static means right?) The object should be large enough to fill the frame. You will use this object for ALL of the next exposures. DO NOT RECOMPOSE. A tripod could be helpful.

2. Focus sharply. Use your manual focus. Get it sharp *before* you make any images.

3. Make a 'good' exposure. Use your histogram. Make sure you do not clip the shadows or the highlights. Your histogram for this 'good' exposure should look approximately like this: To get to where you can see your histogram, once you take the picture, press the PLAY button. If you press the DISP button it will scroll you through various options, one of them will have the histogram. If you have any questions, e-mail me.


4. Open up the lens aperture completely. Set it to it's lowest number...for some of you this will be 2.8, for some it will be 2.0.

5. DO NOT CHANGE THE SHUTTER SPEED.

6. Make an exposure.

7. Close down the aperture one stop (i.e. go from 2.8 to 3.2).

8. Make an exposure.

9. Close down the aperture one stop (i.e. go from 3.2 to 3.5).

10. Make an exposure.

11. Can you guess what comes next? Yep...close down aperture one stop.

12. Make an exposure.

13. Repeat until you have reached your smallest aperture (f/8).

14. DO NOT DELETE ANY EXPOSURES EVEN IF YOU THINK THEY LOOK BAD.

15. Choose a different static object. You will use this object for all of the remaining exposures.

16. Make a 'good' exposure with your aperture set to 5.6. Adjust the shutter speed as needed.

17. Adjust your shutter speed to 1/2000

18. Make exposure. (do not change aperture)

19. Adjust shutter to 1/1000

20. Make exposure.

21. You will continue the pattern using the following shutter speeds in this order: 1/500, 1/250, 1/125, 1/60, 1/30, 1/15, 1/8, 1/4, 0"5, 1", 2", 4", 8", 15". Make an exposure for EACH OF THE SHUTTER SPEEDS.

22. Choose another static object.

23. Repeat steps 2-13

24. Choose another static object.

25. Repeat steps 16-21

26. Have fun making 50 more GOOD exposures of WHATEVER YOU WANT!!!! Remember to consult your histogram. TRUST IT!

Images are due on Monday, Febuary 2. We will upload them in class and discuss our results.  This assignment will require several things.  One...pay ATTENTION TO THE DIRECTIONS!  You will mess up if you don't.  You might mess up even if you do.  You will probably re-shoot this assignment at least one more time.  Be prepared for that.  Come next week with your images and we will talk about what you did wrong...and what you did RIGHT.

Remember...keep it SIMPLE. NOT like this:

Monday, January 25, 2010

Chewie Pitching

This is above the photograph.


This text appears below the photograph.